Job positions
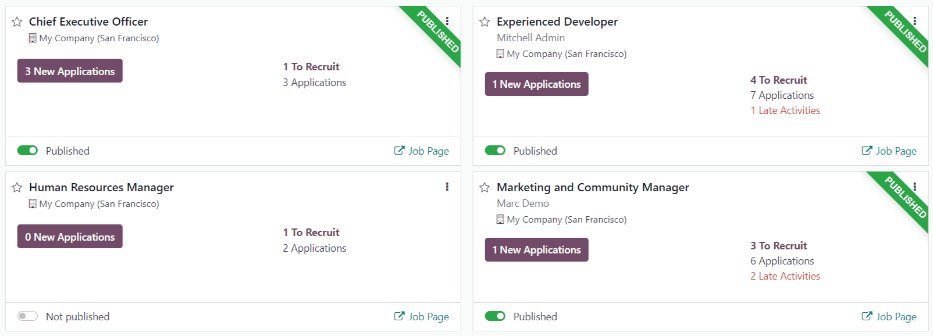
In Odoo's Recruitment application, all job positions are shown on the default dashboard in the Recruitment app, which includes both active and inactive positions.
Each job position is shown in an individual Kanban card. If the job position is active, and candidates can apply, a PUBLISHED banner appears in the top-right corner of the card.
View submitted applications by clicking anywhere on a job position card.
Create a new job position
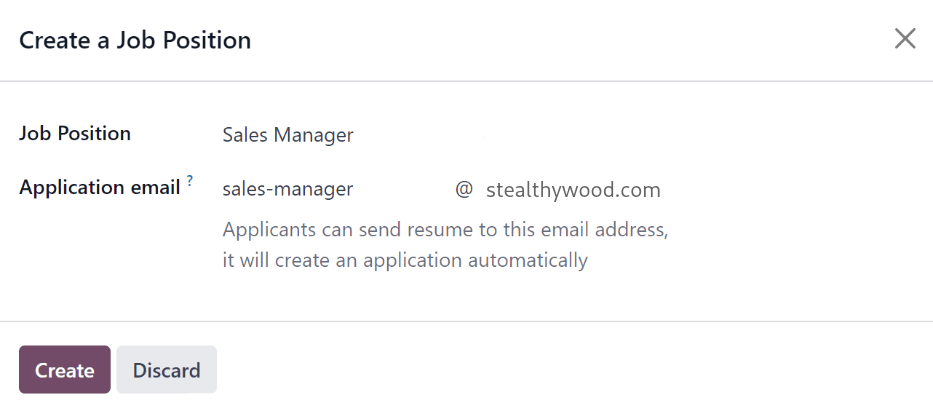
To create a new job position from the main dashboard in the Recruitment app, click the New button in the top-left corner, and a Create a Job Position pop-up window appears.
First, enter the name of the Job Position (such as Sales Manager, Mechanical
Engineer, etc.) in the field.
Next, enter an Application email by typing in the first half of the email address in the first field, then select the second half of the email using the drop-down menu in the second field. Applicants can send a resumé to this specific email address, and Odoo creates an application for them automatically.
When complete, click the Create button to save the entry, or the Discard button to delete it.
Once the job position has been created, it appears as a card in the Kanban view on the main Recruitment app dashboard.
Edit a new job position
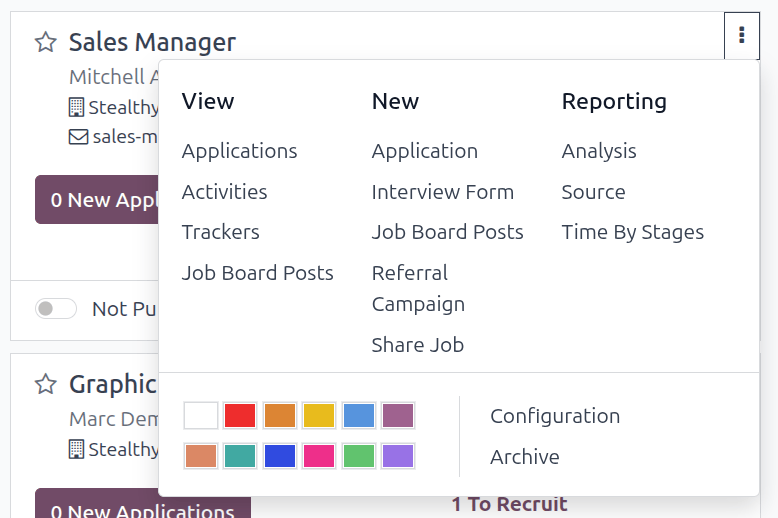
After the job position is created, it is time to enter the details for the position. Click on the (Dropdown menu) icon in the upper-right corner of the relevant card to reveal several options, and then click Configuration to edit the details.
注釈
The top-right corner of the card has a toggle to publish the job position to the website. If the job position is published, a green Published toggle is visible. If the job position is not published a gray Not Published toggle appears. Click the toggle to publish or unpublish the job position.
Recruitment tab
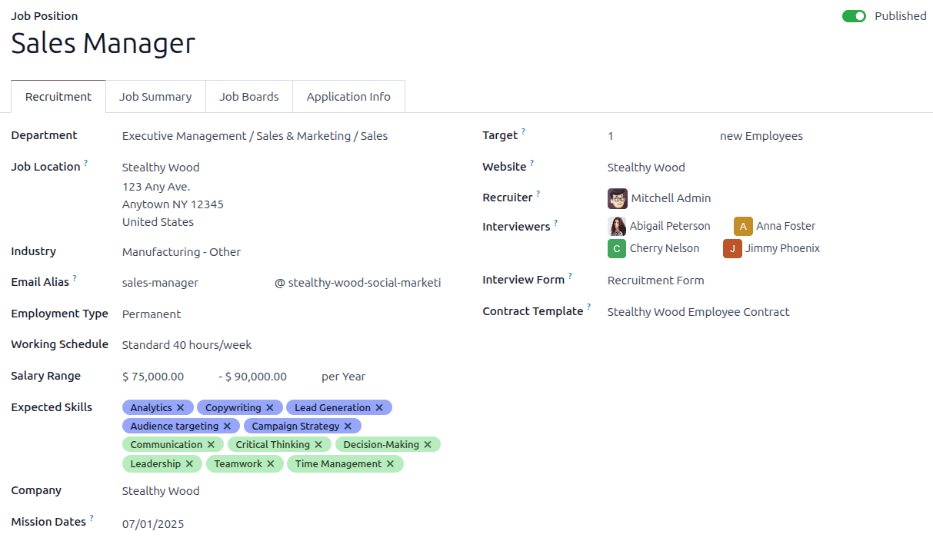
All the basic information about the job position is listed under the Recruitment tab.
None of the fields are required, but it is important to configure and populate the Department, Job Location, Employment Type fields, and the Job Summary tab, as they are all visible to prospective applicants on the website.
注釈
Some fields listed below may not appear depending on the database configuration and other installed applications.
The fields can be filled out as follows:
Department: Select the relevant department for the job position. This is visible on the website.
Job Location: Select the physical address for the job. If the job position is remote, leave this field blank. This is visible on the website.
Industry: Select the relevant industry the job position falls under. This field corresponds to the industries on job boards. Odoo comes with 86 preconfigured industries. It is not recommended to add a new industry, as it may hide the job position during some searched on the various job boards.
Email Alias: Enter an email address to which applicants can send a resumé. Once emailed, Odoo automatically creates an application for them. If an email was entered when creating the job position, this field is populated.
Employment Type: select what type of position the job is, using the drop-down menu. The default options are Permanent, Temporary, Seasonal, Full-Time, Intern, Student, Apprenticeship, Thesis, Statutory, and Employee. Depending on the installed localization, other options may be available. This is visible on the website.
Working Schedule: Select the working schedule for the job position. Odoo provides one working schedule by default, Standard 40 hours/week, but all working schedules in the database are available.
Salary Range: Enter both the minimum and maximum salaries offered for the position in the two fields. Then, set the last field to the time-frame for the salary range. The default options are Hour, Day, Week, Bi-Week, Month, and Year.
Expected Skills: Select all the desired skills for the job position, using the drop-down menu. The skills presented are configured in the Employees app.
Company: Select the company the job is for. This field only appears if using a multi-company database.
Mission Dates: Using the calendar selector, set the start date for the job position. If the job is temporary and has a specific end date, set the end date in the second field.
Target: Enter the number of employees to be hired for this position.
Website: Select the website the job is published on.
Recruiter: Select the person responsible for recruiting this role.
Interviewers: Select who should perform the interviews. Multiple people can be selected.
Interview Form: select an Interview form that applicants fill out prior to their interview.
Contract Template: Select a contract template to be used when offering the job to a candidate.
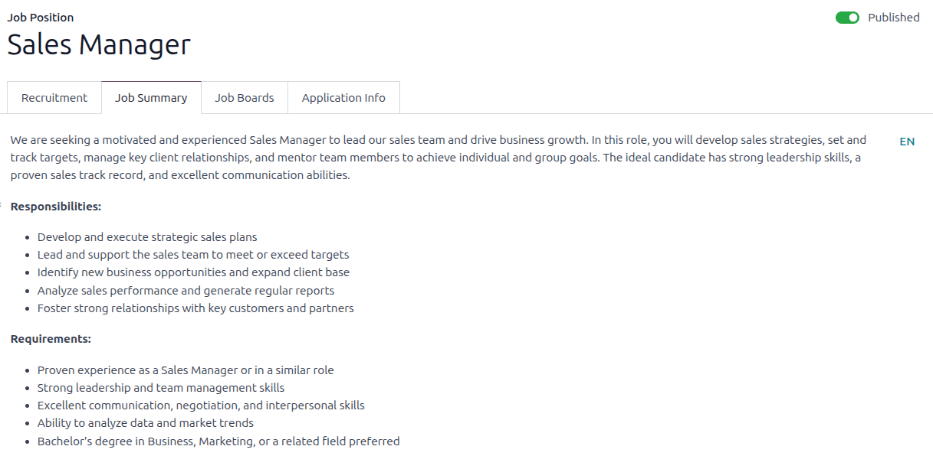
Job summary tab
Enter the job description in the Job Summary tab. This description is visible on the website.
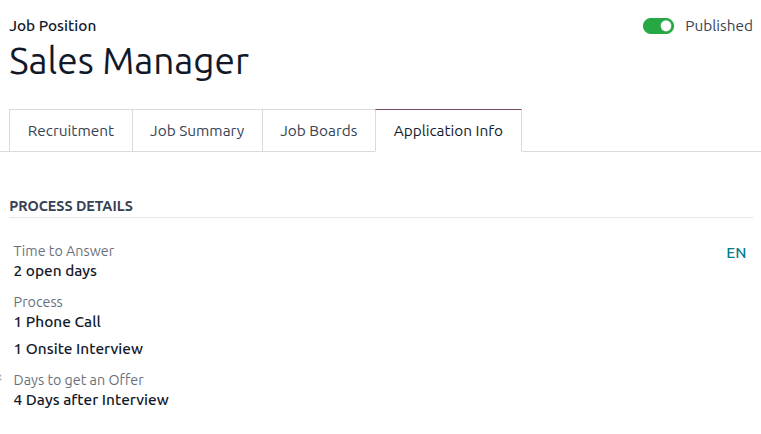
Application info tab
The Process Details section of the Application Info tab contains information that is displayed online for the job position. This informs the applicants of the timeline and steps for the recruitment process, so they know when to expect a reply.
The following fields are populated by default, but can be modified to suit the recruitment timeline of the business:
Time to Answer: Enter the number of days before the applicant is contacted. 2 open days populates this field by default.
Process: Enter the various stages the candidate goes through during the recruitment process. By default, two process steps are visible: 1 Phone Call and 1 Onsite Interview.
Days to get an Offer: Enter the number of days before the applicant should expect an offer after the recruitment process has ended. The default is 4 Days after Interview.
注釈
The Process Details section is a text field. All answers are typed in rather than selected from a drop-down menu. The text is displayed on the website exactly as it appears in this tab.
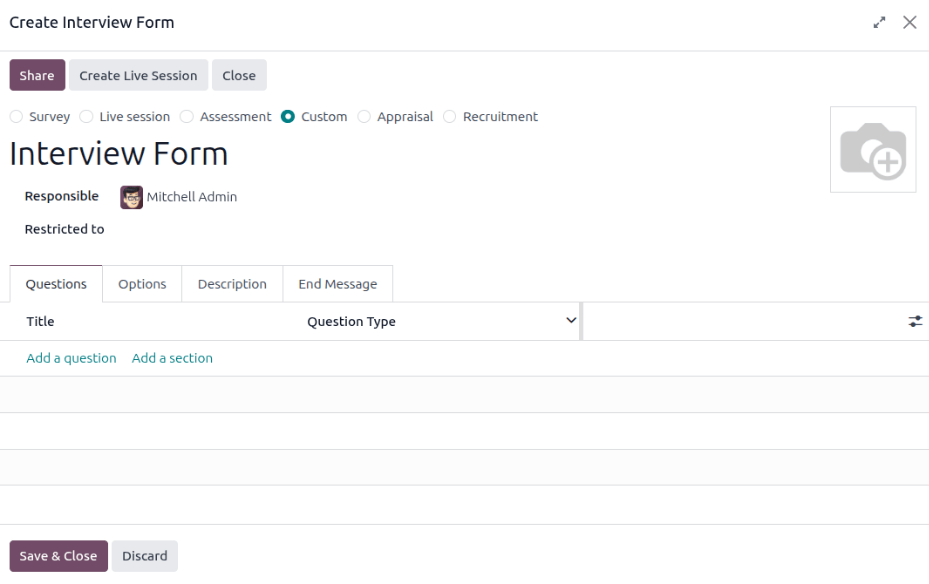
Create interview form
An Interview Form is used to determine if a candidate is a good fit for a job position. Interview forms can be as specific or general as desired, and can take the form of a certification, an exam, or a general questionnaire. Interview forms are determined by the recruitment team.
Before creating an interview form, ensure the proper settings are enabled. Navigate to , and under the Recruitment Process section, ensure the Send Interview Survey option is enabled.
Since there are no preconfigured forms in Odoo, all interview forms must be created. To create an interview form, start from the Recruitment tab of the Job Position form. In the Interview Form field, enter a name for the new interview form. As the name is typed, several options populate beneath the entry: Create (interview form name), Search More..., and Create and edit.... Click Create and edit... and a Create Interview Form pop-up window appears.
注釈
The option Search More... only appears if there are any interview forms already created. If no interview forms exist, the only options available are Create (interview form name), and Create and edit....
Proceed to fill out the interview form pop-up window as a typical survey. For specific directions on how to create a survey, refer to the survey essentials document, which provides step-by-step instructions on how to create and configure a survey.